quinta-feira, 21 de outubro de 2010

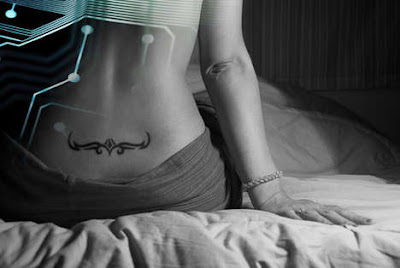
Tatuagens em LED Tattoos on LED


Um novo tipo de tatuagem vem por aí. Tatuagens em LED estão sido desenvolvidas por pesquisadores da Universidade da Pensilvania e Illinois. Ao contrário das tradicionais tatuagens com tinta o principal objetivo das tatuagens com LED não será fazer uma declaração de moda.

Os usos iniciais previstos são para fins médicos, para leitura da taxa de açúcar no sangue, por exemplo, isto será possível através da incorporação de um transistor de silício sob a pele. O foco principal da pesquisa é sobre epilepsia, mas também abrange neurocirurgia funcional, rede e neurociência computacional, distúrbios do movimento, monitorização intra-operatória e na UTI, as doenças mentais graves e outros transtornos do cérebro.

Tatuagens animadas e programáveis em LED conectado ao cérebro? Você poderia mostrar suas animações mais recentes em FLASH, assistir TV no seu braço, ou ter uma tela PDA embutida em sua pele. As possibilidades são infinitas. (Hplusmagazine)

A new type of tattoo comes around. Tattoos on LEDs are being developed by researchers at the University of Pennsylvania and Illinois. Unlike traditional tattoos inked the main objective of the LED with tattoos will not make a fashion statement.

The initial uses are provided for medical purposes for reading rate of blood sugar, for example, it will be possible through the incorporation of a silicon transistor under the skin. The main focus of the research is about epilepsy, but also encompasses functional neurosurgery, network and computational neuroscience, movement disorders, intraoperative monitoring and ICU, severe mental illness and other disorders of the brain.

Tattoos animated and programmable LED connected to the brain? You could show off their latest FLASH animations, watch TV on your arm, or have a PDA screen embedded in your skin. The possibilities are endless. (Hplusmagazine)

Mobília Psicodélica Psychedelic Furniture


Disco Chair

Fonte: http://www.kiwiandpom.com/project.php?id=12
Source: http://www.kiwiandpom.com/project.php?id=12

Hotéis 5 estrelas exóticos 5 Star Hotels Exotic


Ilustrações de Nuno da Costa Illustrations by Nuno da Costa


Nuno da Costa é um ilustrador auto-didata, nascido em Londres, suas ilustrações foram utilizadas em várias publicações sobre moda.

Site: www.trendhunter.com/photos/91228#3

Nuno da Costa is a self-taught illustrator, born in London, his illustrations were used in various publications about fashion.

Site: www.trendhunter.com/photos/91228 # 3

Five Seasons Festival


Instalação em Chaudfontaine, na Bélgica.
Installation in Chaudfontaine, Belgium.

Querida encolhi as crianças Honey I Shrunk the Kids


Instalações do artista Robert Therrien.

Site: www.gagosian.com/artists

Installations of artist Robert Therrien.

Site: www.gagosian.com / artists

Bolo de Casamento de Queijo Cheese Cake Wedding


Site: www.thecheeseshed.com

segunda-feira, 18 de outubro de 2010

Casamento de Cachorro Dog Wedding


Site: www.google.com

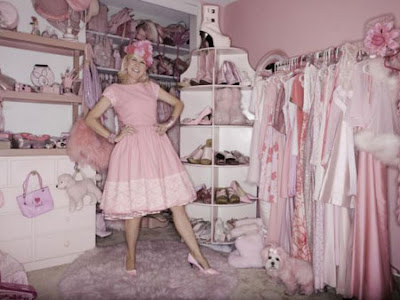
Dama de Rosa Lady in Pink


Não tem ninguém mais fanático pela cor rosa. A atriz Kitten Kat Sera, de 46 anos, decidiu há 25 que só usaria roupas pink. Fez mais. Decorou a casa inteira, em Los Angeles, de rosa. Seu cachorro, um maltês chamado Kisses, não foi poupado e ganhou pelos nesse tom – segundo Kitten, foi de tanto o bicho tomar suco de beterraba.

A atriz garante que é uma pessoal normal, normalíssima – pelo menos é o que tem dito a jornais americanos que se interessaram pelos hábitos originais da mulher.

- Algumas pessoas estranham, mas na Califórnia todos me conhecem como a dama de rosa. Sinto-me feliz, fofa e luxuosa.

Ela mora numa residência que parece uma casinha de boneca. Lençol, cortina, objetos, travesseiros, mesas, paredes, portas, carpete, armários – é tudo rosa.

Se ela já assustou namorados com tanto rosa? Não, ela jura.

- Kisses é o amor da minha vida, diz em sua página no myspace.

O fanatismo pela cor só tem ajudado, até na carreira de atriz.

- Já ganhei muito papel em filmes e séries de TV em Hollywood. Essa cor não sai da minha cabeça, conta a dama de rosa.

Dá pra ver.

Site: www.noticias.r7.com

There is no one more fanatical by pink. Actress Kat Kitten Sera, have decided that would only wear pink clothes. She did more. She decorated the whole house in Los Angeles, in pink. His dog, a Maltese named Kisses, was not spared and won by that tone - as Kitten, both the animal was taken beet juice.

The actress is sure that a normal person, normal life - at least that is what she has told U.S. newspapers that are interested by the unique habits of women.

- Some people are surprised, but in California all know me as the lady in pink. I am happy, fluffy and luxurious.

She lives in a residence that looks like a doll's house. Sheet, curtain, objects, pillows, tables, walls, doors, carpet, cabinets - everything is pink.

If she ever scared boyfriends with both pink? No, she swears.

- Kisses are the love of my life, says on his myspace page.

Fanaticism has helped only by color, by an actress.

- I've won a lot of paper in films and TV series in Hollywood. This color does not come out of my head, tells the lady in pink.
You can see it.

Site: www.noticias.r7.com

Baby Center Brasil


Tire todas as suas dúvidas sobre gravidez, parto, tudo sobre o bebê, tudo sobre a criança de até 3 anos, alimentação e muito mais. Receba ainda um boletim semanal grátis por e-mail com todas as informações sobre o desenvolvimento do seu bebê, basta cadastrar-se.

Site: www.brasil.babycenter.com

Get all your questions about pregnancy, birth, everything about the baby, everything about the child up to three years, food and more. Plus, receive a free weekly newsletter by e-mail with all information about your baby's development, just sign up.

Site: www.brasil.babycenter.com

Vestidos de Noiva a partir de $59,99 no Light in the Box Wedding Dresses from $ 59.99


Site: www.lightinthebox.com

domingo, 17 de outubro de 2010

Decoração Natal 2010 - Mercadão das Cestas Christmas Decoration 2010


Gente, as árvores e decorações para o Natal 2010 da loja Mercadão das Cestas em Goiânia (Av. T-9 próximo ao clube Oasis) está simplesmente divina. Tem para todos os gostos, árvore montada pronta, artefatos para decorar do seu jeito, cada um mais lindo que o outro. Vale conferir!

Site: www.mercadaodascestas.com.br

People, trees and decorations for Christmas 2010 from the store Mercadão das Cestas in Goiânia (T-9th Avenue near the Club Oasis) is simply divine. It has something for everyone, ready assembled tree, artifacts to decorate your way, each more beautiful than the other. It is worth checking!

Site: www.mercadaodascestas.com.br

Casinha de Gengibre - um toque doce e divertido para o Natal Ginger House - a sweet touch and fun for Christmas


Ingredientes

3/4 xícara (170 g) de manteiga
7/8 xícara (190 g) de açúcar mascavo apertado na xícara
1 colher (chá) de raspas de limão siciliano
1 1/2 colher (sopa) de suco de limão siciliano
1/2 xícara (120 ml) de melado escuro
2 ovos
3 xícaras (375 g) de farinha de trigo
2 colheres (chá) de fermento em pó
1 colher (sopa) de gengibre em pó
1 colher (sopa) de pimenta-da-jamaica em pó
Glacê:
6 claras de ovos
1,75 kg de açúcar de confeiteiro peneirado
Confeitos e gomas variados para decorar
Modo de preparo


1. Primeiro, recorte em cartolina fina: uma parede lateral, 12 x 20 cm; uma parede de fundo, 12 x 13 cm; uma cumeeira (parte superior de uma parede construída em forma de triângulo), 12 x 7,5 x 7,5 cm; e um telhado retangular, 12 x 23 cm. Prenda com fita o pedaço retangular da parede de fundo ao da cumeeira em forma de triângulo: iguale o lado maior do triângulo, 12 cm, a uma das laterais de 12 cm da parede de fundo.


2. Em uma tigela grande, bata a manteiga e o açúcar até obter um creme. Acrescente as raspas e o suco de limão, além do melado, e mexa. Aos poucos, adicione 2 ovos e bata. Peneire a farinha junto com o fermento em pó e os temperos. Acrescente essa mistura à outra cremosa. Embrulhe a massa em papel vegetal. Leve-a à geladeira por 1 hora.


3. Vire a massa em uma superfície levemente enfarinhada. Divida-a em 6 porções, 2 um pouco maiores do que as outras. Ainda em uma superfície levemente enfarinhada, abra os 4 pedaços menores de massa até chegar ao tamanho dos moldes das paredes laterais e dos fundos. Corte dois pedaços de cada. Abra a massa restante e corte-a em dois pedaços retangulares de telhado. Transfira a massa para os tabuleiros untados.


4. Em forno preaquecido a 190ºC, asse por 10 minutos. Ou, então, até ficar crocante. Ao retirá-lo do forno, deixe-o nos tabuleiros por alguns minutos para esfriar. Depois, transfira-o para grelhas aramadas de inox. Deixe-o lá por uma noite para endurecer.


5. Em uma tigela grande, misture levemente 2 claras. Acrescente aos poucos e bata cerca de 1/3 do açúcar de confeiteiro. O glacê deve ser liso e com picos firmes. Espalhe ou aplique o glacê com um saco de confeitar em uma tábua de bolo, formando uma linha de 23 cm e pressione-a em uma das paredes laterais de modo que se fixe e permaneça na posição vertical. Se necessário, espalhe ou aplique com um saco de confeitar um pouco de glacê extra, ao longo dos dois lados, para ajudar a dar suporte. Pegue a parede dos fundos e passe o glacê em ambas as extremidades das laterais. Espalhe ou aplique com um saco de confeitar uma linha do glacê na cartolina em ângulo reto com a primeira parede. Pressione a parede dos fundos na posição. Repita esse processo com as outras duas paredes até todas estarem nas respectivas posições. Deixe que as paredes endureçam juntas por duas horas, no mínimo, antes de colocar o telhado. Espalhe ou aplique com um saco de confeitar uma camada mais espessa de glacê na parte superior de todas as paredes. Fixe as peças do telhado nas posições corretas. O telhado deve se sobrepor às paredes para formar o beiral. Coloque com um saco de confeitar ou espalhe um pouco de glacê ao longo do cume do telhado para prender as duas partes, mantendo-as firmes. Deixe a casa descansar por uma noite para endurecer.


6. Quando a casa estiver pronta para decorar, prepare o glacê restante. Em uma tigela grande, bata levemente 4 claras. Acrescente o açúcar de confeiteiro restante e misture como antes. Esse aqui é para fazer a neve no telhado e colar diversas guloseimas a serem usadas na decoração. Termine polvilhando a casa com açúcar de confeiteiro peneirado.

Site: http://allrecipes.com.br/receita/2664/casinha-de-gengibre.aspx

Ingredients

3 / 4 cup (170 g) butter
7 / 8 cup (190g) brown sugar pressed into the cup
1 teaspoon (tsp) lemon zest
1 1 / 2 spoon (soup) of lemon juice
1 / 2 cup (120 ml) dark molasses
2 eggs
3 cups (375 g) flour
2 teaspoons (tsp) baking powder
1 spoon (soup) ground ginger
1 spoon (soup) of chilli-powder-jamaica
Icing:
6 egg whites
1.75 kg of sifted confectioners' sugar
Confectionery and chewing varied to decorate
Preparation


1. First, cut in thin cardboard: a side wall, 12 x 20 cm, a bottom wall, 12 x 13 cm and a ridge (the top of a wall built in a triangle), 12 x 7.5 x 7.5 cm and a rectangular roof, 12 x 23 cm. Attach the ribbon with a rectangular piece of the bottom wall to the ridge-shaped triangle, equals the long side of the triangle, 12 cm, one side of 12 cm from the bottom wall.


2. In a large bowl, cream butter and sugar until creamy. Add zest and lemon juice, and molasses, and stir. Gradually add 2 eggs and beat. Sift flour with baking powder and seasoning. Add this mixture to the other smooth. Wrap dough in wax paper. Take it to the fridge for 1 hour.


3. Turn the dough on a lightly floured surface. Divide it into 6 portions, 2 slightly larger than the others. Still on a lightly floured surface, open the four smaller pieces of dough until you reach the size of the molds and the side walls of the funds. Cut two pieces of each. Open the remaining dough and cut into two rectangular pieces of roof. Transfer dough to greased trays.


4. In a preheated oven at 190 º C bake for 10 minutes. Or, until crisp. When removing it from the oven, leave it in the trays for a few minutes to cool. Then transfer it to the stainless steel grates aramid. Leave it there overnight to harden.


5. In a large bowl, mix 2 egg whites lightly. Add gradually and beat about 1 / 3 of the sugar. The icing should be smooth and stiff peaks. Spread frosting or apply with a pastry bag in a board of cake, forming a line of 23 cm and press it into a side wall so that it remains secure and upright. If necessary, spread or apply with a pastry bag a little extra icing along the two sides to help support. Take the rear wall and pass the icing on both ends of the sides. Spread or apply with a pastry bag of icing a line on the paper at right angles to the first wall. Press the back wall into position. Repeat this process with the other two walls until all were in their respective positions. Let the walls to harden together for two hours at least before putting the roof. Spread or apply with a pastry bag a thicker layer of frosting on top of all walls. Attach the roof pieces in the correct positions. The roof should overlap the walls to form the eaves. Place in a pastry bag or spread a little icing along the roof ridge to hold the two parties, keeping them secure. Let the rest home for a night to harden.


6. When the house is ready to decorate, prepare the frosting remaining. In a large bowl, lightly whisk 4 egg whites. Add the remaining icing sugar and mix as before. This here is to make snow on the roof and paste various goodies to be used as decoration. Finish by sprinkling the house with sifted confectioners' sugar.

Site: http://allrecipes.com.br/receita/2664/casinha-de-gengibre.aspx